Introduction
Python is becoming more and more popular programming language these days. It is indeed easy to learn, developer friendly and a very powerful programming language. In this post we are going to lay out the steps to install Anaconda distribution of Python 3 on Windows, the basic know-how of working with python shell, instructions install new python libraries/packages, and an overview of Jupyter Notebook.
Step by Step Guide
Python is available on python.org, but we’ll be installing python using free Anaconda distribution as it comes with many useful libraries and Jupyter Notebook. Jupyter Notebook is a very useful tool if you are new to python and want to play around with things. It will allow you to run and test small snippets in an interactive manner, you can also save your notebooks for future reference. If you don’t need all the libraries that Anaconda comes with and want to save space then you can install miniconda – a relatively smaller distribution.
Download Anaconda distribution for Python 3
Go to anaconda download page and scroll down a bit, you’ll see a page similar to below. Select your operating system as Windows and installer (64/32 bit), and Click on the download button. It will download an executable file. It may also prompt you to subscribe to Anaconda cheat sheet, you can you fill the form if you don’t mind getting periodic emails from Anaconda.

Install Anaconda
Once the installer is downloaded you can click on it and start the installation. The installation process is as straightforward as any typical windows software installation. You’ll be prompted to choose an installation directory, accept user agreement etc.
During installation, it will ask you to add Anaconda to your PATH. If you have other versions of python previously installed then you may not want to add Anaconda to PATH unless you have a fair understanding of what adding to PATH is going to do. If this is the first installation of Python then you can choose to add Anaconda to PATH. It will say this is not recommended. Do it anyways. It will also ask you to install MS Visual Source code, you can skip it. At the end it will ask you to share your projects, notebooks on Anaconda cloud, check the boxes if you prefer that. This is a straightforward installation but If you run into any issues then you can browse the detailed installation guide on Anaconda website.
If you have decided to go with miniconda over full anaconda distribution then you can download it from
Launch Python Shell
If you are at this step then you have successfully installed Anaconda. Congratulations! Now we are going to run python shell and run a couple of commands just to get a feel of it.
- Open Windows command prompt (search start menu for ‘cmd’).
- Type python on the terminal and hit enter. It will open a Python shell. You can open it from any directory if Anaconda has been added to your PATH variable. If not then browse to the directory where you have installed anaconda (cd <directory>) and then run ‘python’
- Run a print(‘Hello’) command to do a sanity test.
- You can run help() to open an interactive python help. If you are looking for help on a specific command then just pass the keyword as an argument to help function. Ex: help(“print”)
- Type exit() to come out of the python shell

Install Additional Libraries/Packages using PIP
Python provides pip install command line utility to easily install additional libraries. There are umpteen Python libraries available on the web for various purposes. You can just google ‘python library to do
Upgrade PIP
First, upgrade your pip install utility by running below command
python -m pip install --upgrade pip
Install Dependencies using PIP
You must have noticed the red colored warning above stating ‘msgpack is not installed’. Let’s install the msgpack package first for a demonstration, followed by cx_Oracle and openpyxl. To install these, run below commands on Python shell.
pip install msgpackInstall cx_Oracle and Openpyxl
Once you have installed msgpack, install cx_Oracle and openpyxl using below commands.
pip install cx_Oracle
pip install openpyxl
pip will download the package and install it. It will also uninstall the older version of the package if there is any. As you can see in the screenshot it successfully installed msgpack, however, the other two were already installed in my machine so the command just came back stating ‘requirement already satisfied’.

The cx_Oracle package is useful to connect to Oracle database, run queries, load data etc, whereas openpyxl is to perform operations on excel spreadsheets. You can find detailed documentation on these by running help() command on them in the python shell. Note that the argument to help function is case sensitive.
help("cx_Oracle") help("openpyxl")To list all the installed libraries/packages run below command in Python shell
help("modules")Conda Virtual Environments
One of the benefits of installing Anaconda is it comes with its native package management tool called Conda. It works in similar ways as PIP, but it’s much more elegant than PIP, especially in its ability to resolve dependencies. While working on Python projects, the general best practices are to create virtual environments and work under your own isolated work-spaces. You can create virtual environments using
What is Jupyter Notebook?
You can always use Python Shell to play around, run various commands and write small snippets to test and learn Python. But if you don’t like working on terminal then Jupyter Notebook is a far better alternative for you. Jupyter Notebook will also allow you to run a set of commands all at once like a script. Additionally, you can save your notebooks to load and run them again in the
Launch Jupyter Notebook
Go to start menu and search ‘anaconda navigator‘ desktop app. It’ll open the navigator app that will look like below.

Anaconda Navigator app helps you navigate, install and launch various tools that Anaconda provides. You can choose to install more by clicking on the install button below them. Nevertheless, to open Jupyter Notebook, click on the launch button on the given tool. Jupyter Notebook is browser-based so it may ask you to choose your preferred browser at first. You can also open Jupyter notebook by running ‘Jupyter Notebook‘ command on Win command prompt.

Once opened you’ll see a page like below.

Jupyter will list out your local files and directories. Navigate to a folder where you want to save your notebooks and then click on the new button on top-right corner to open a new notebook. You can also upload existing notebooks by clicking on the upload button.
Execute Python Commands on Notebook
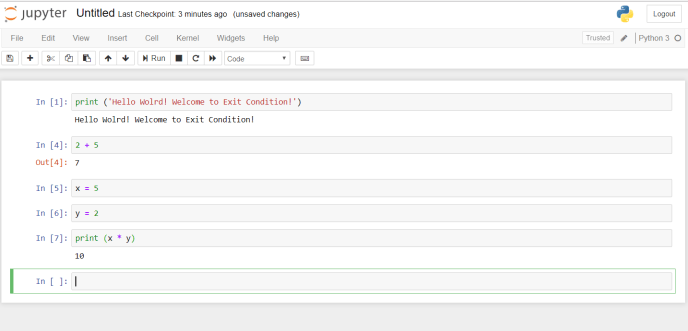
Once a new notebook is opened you can run any Python commands in it. Just type the command and click on ‘Run’ button or type Shift + Enter. Also, you can even run basic math formulas. You can define variables, create functions, classes, write loops etc. Finally, to save the notebook click on File -> Save. It will save it as a .ipynb file.
There are many more things you can do with the notebook, we’ll cover them in our future posts.
Congratulations! You have all set to use Python
Finally, hope you found this post useful. Ran into any issues? Want to suggest an edit? Want us to write about a specific topic? We’d love to hear from you. Please leave your feedback in the comments below. Seriously, don’t be shy. 🙂
And yeah, don’t forget to share it with your friends and colleagues. Subscribe to Exit Condition and follow our social media pages to get regular updates. Thanks for stopping by. Happy Learning!